Sunday, September 16, 2018

Mini Doughnut Hair~ Twin Buns Tutorial~


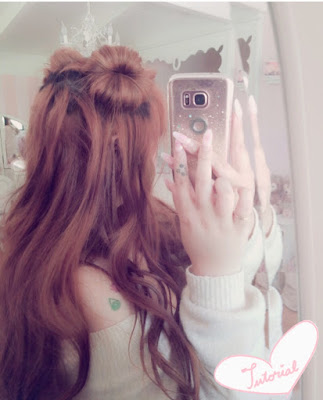
So, maybe a year ago, my friend was sleeping over and we got really into the anime Please tell me Galko-chan, and as a joke midway though watching the series, I quickly figured out how to recreate Galko's hair and surprised my friend with a small in person demonstration of how easy her hairstyle is to wear.

Well, I ended up falling in love with how cute and extremely easy the mini doughnnut hair is to do, after that, and have been wearing it quite often this past year!

The way to wear mini donuts, is so quick and simple that I felt a small pictorial would be the most convenient way to explain how to recreate the look.


Items needed:
2 socks (I used some thin ankle socks)
Comb, to part hair cleanly

Optional:
Alligator clips, for hair separation
Curler


The first step is to make a sock doughnut~ easily done by cutting off the toe of the sock and rolling it into a doughnut.

The smaller the sock, the more petite the buns are. I personally like thin fabric ankle socks because the buns come out cute and compact. Larger, thicker socks will make buns that look large and plump, like a big fluffy yeast doughnut.


So, to start, separate the top 1/3 of hair, roughly an inch above the ear line.
To keep the hair easily organized, I like to use alligator clips but tying the bottom section of hair into an elastic is just as convenient too. 

Next, split the top section of hair down the middle and arrange the face framing pieces of hair as desired.

Taking one side of the parted area, pull hair though one sock roll.

Slowly and neatly working from the end of the hair down, tuck the hair over the sock roll and start rolling the doughnut down the hair. Making sure to keep the hair evenly spaced and keeping the rolling process neat will make the bun look cleaner AND will keep extra frustration at bay when it comes time to fixing up the doughnuts after.

After completing the roll, pull and fluff out any hairs where necessary to make the doughnut look nice and round.

Repeat the process on the second section of hair.

Then finally, style the rest of the hair as desired. I personally love how the doughnuts look perched on loose waves.

Some practice might be necessary (especially with long hair), but after getting the hang of it, the hair style is so quick to master!

I love wearing mini doughnut hair when I'm in a rush for classes but still want to look like I put in effort to look good, or days I just want to look cute and playful, but the most common scenario for me is when I have slightly dirty hair that needs to sorted out.

For fans of Galko-chan, or those who might get frustrated with trying to make even doughnuts, the style even  looks cute with one side doughnut-ed and the other section put into a ponytail.


So, from your local, off an on again gaijin-gyaru, I hope that this pictorial was helpful and that rocking mini doughnut hair might become something fun and new for my readers to try out, maybe come to love as I have!

Maybe if I ever have more time to watch cartoons, I can find more 2d hair inspiration to showcase here too? I'll have to wait till winter break for that though;;

<3CarisseIris

Sunday, September 9, 2018

Ribbon T-Shirt Dress~ DIY


It’s been awhile since I did a proper fashion DIY! 
I was so excited to take on this project because it ended up being so easy, and no sewing required!


What started this obsession with ribbon t-shirt dresses were all the J-fashion apparel I’ve been seeing with similar styles over the past 2 years. Like most niche  things, I didn't see any designs that I necessarily wanted. Since the first iteration of this dress I saw was a Disney, The Little Mermaid, featured item, I had cemented that I needed my own Disney related ribbon dress too!


Like most of my outfit ideas, I have to sketch it out properly. Following my J-fashion inspirations, I wanted ribbons to lace down the sides. I also wanted to add some extra flair, and decided to see how a ribbon lacing over the shoulder would fair.


I’ve had a Powerline, from A Goofy Movie, shirt for a few months now that I never could figure out how to wear. So, I set that up to be my experimental shirt for this blog.


Items needed:

T-shirt (preferably on the longer side)
Ribbons (for my design, I had a lot of places to use ribbon and added length, so I used a bit over 21 ft)
28 extra large eyelets
Extra large eyelet tool~ I bought 10 eyelets + tool in a pack
Hammer
Scissors 
Marker or fabric chalk
Concrete work surface !

Optional:

8 extra large eyelets (for shoulder detail)
Wrench, to hold the eyelet tool

So, to make my t-shirt dress, I came up with a game plan! 

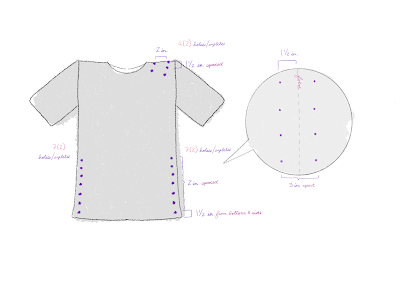
2 rows of 7 eyelets on each side~
First one starting 1.5 in. from the bottom, and each eyelet is spaced 2 inches apart. 
The two rows are spaced 3 in. In between. 


I marked out all my measurements, and placed a dot in marker where I wanted to place my eyelets.


For the shoulder detail, I picked a random placement on the shoulder, diagonally.
I spaced a line of 4 dots 1.5 in apart.
Then, 2 in. over, I repeated the same process.


After creating my dots, I made a small incision with my scissors on each dot.

The hole should be just big enough to squeeze the raised tube of the eyelet into! Any bigger and the eyelet can fall off.


This is an eyelet~
It has two parts, the tube disk and the toothy side.


The eyelet tool consists of two parts, the base and the mallet.
The eyelet should fit perfectly into the eyelet tool for a snug application.

To install the eyelet, make sure the fabric is inverted!
On a clear concrete surface, place the tool base.
Place down the tube disk, tube up.
Stretch the hole in the shirt over the tube. (The bottom of the tube disk is the pretty side, so you want to make sure its on the visible side of the shirt).
Place the toothy side over the tube, sandwiching the fabric.
Put the mallet over the eyelet, fitting it snugly into the tube.


The eyelet +fabric sandwich should look like this.


Installation seems to only work on a clear concrete surface, trust me on this.
Double check that the eyelet and tool base isn’t resting on any part of the other side of the shirt (the shirt will get destroyed if you hammer on it, it happened to me!)
Then, take your hammer, and hammer hard a few times on the mallet!


A wrench, or any gripping type tool, is great to hold onto the mallet for those who are scared of hammers +fingers or extremely clumsy.
Once I figured out that I would hurt myself less and hammered harder holding the mallet with another tool, installing the eyelets went so quickly!


After all the eyelets are installed, threading them with ribbon is the easiest task!


Voila! A cute ribbon t-shirt dress! 


My finished coordinate looked exactly like I sketched out. I was quite happy with my handy work. I love that it’s a perfect mix of casual and cute! Also, that I can now turn any boring screen tee into a cute statement piece! 


Now, I can do the same thing to my mermaid lagoon shirt that I bought to perfectly compliment my style! The options are now limitless on how I can thread ribbons onto my clothing!

<3CarisseIris 

Sunday, September 2, 2018

Living in a Pink Bubble~ School Supply Edition


The school year has finally started and I’m starting my third semester! I feel like I’ve finally gotten into the flow of things and feel comfortable enough to share my education staples. Of course, in typical ‘me’ fashion, I grew my collection to match my pastel lifestyle. I quite enjoy things that are visually appealing and yet still serve a valid function, deciding to invest in pieces I love makes studying a joy.


My main piece is a Samatha Vega, under Samatha Thavasa,  a4 tote bag. I struggled with backpacks the last 2 semesters and realized after ditching my backpack for my reusable canvas tote that sits in my car every other day, that I feel more comfortable carrying my school items in a tote bag. The standard ‘a4’ tote size (named such because it can fit a4 sized folios and binders within it) is perfect for my needs. Samantha Thavasa makes some beautiful a4 tote bags that also have wide bases which could comfortably hold as many school supplies as I needed. 


I also invested in a printer to save me the stress from my school’s computer lab, which is always packed! I bought a cute Bluetooth enabled pink printer, second hand, that syncs beautifully with my iPad and mobile device! (I know, I also have a pink Nintendo switch hiding out back there, but I’ll be devoting a full blog to that down the road!)


The cheaper books, if not available 2nd hand or for rental, tend to be available for purchase in loose leaf style. I lucked out this semester and needed to purchase 2 books that came with access codes to do my homework. So, I needed some sturdy binders to contain my text books. I found these cute binders by russel+hazel.


Now, onto the fun stuff! Folders, folios, and stationary!


For my classes this semester, I’m taking mathematics and science courses, so I need a notebook for working out my formulas. All my teachers recommended that keeping a ‘problem’ notebook would be advantageous in their courses so, I have 3, one for each class. Right now, I have an older Laduree notebook that I had laying around, that I use for math. For my other two courses, I use some basic bullet style notebooks which I find more convenient to write in. My math notebook is just more photogenic;; 

I also have an accordion style folder, that I’ve used every semester to keep all my loose leaf papers, hand outs, homework, scantrons, and anything of the like. I find the fan out style folders are so useful in keeping everything together and neatly filed! Also, mine is made of plastic so it’s quite durable. It’s hands down one of my most important items I keep on me and readily available. I bought mine [here]


A fun little fact is that my pencil case is actually a makeup brush holder! I bought this travel makeup brush organizer second hand since it’s an older piece from Liz Lisa’s retired line, Chambre a Coucher.  Shockingly it fits everything I need, keeps everything organized, and sits wonderfully flat which makes it fit nicely into my bag or on my desk.

As for my stationary supplies, I have three different collared highlighters, two 3 ink colored pens + ink refills, a mechanical pencil + lead refill (I should also have a #2 pencil, oops), two erasers that resemble macaroons from Laduree, and miscellaneous washi tape that I use in my planner or to bookmark pages. 


My most used items in my stationary station would be my Uni a-gel mechanical pencil, Uni Style + Fit multi chamber pen (which I actually have 4 of, 2 in my pencil holder, one in my planner, and one that I keep in my room~ I just adore them and how well they write!) I like to use the smallest pen refill size in them which would be the .28mm, and for my highlighter I like the Zebra midliner which is easily found locally and I can pick up a refill easily.

I also use my Ti-30 calculator for every class. It also came highly recommended by all my instructors as it works with log and sin functions as well as with exponents. It also don’t have memory storage, which is not allowed in any of my classes.


With me always, is my planner and my bkr water bottle. In my planner I write down everything; classes, what I need to do, upcoming assignments, due dates, etc. It contains my life and one of my other Style + Fit multi-ink pens. Without my planner, I think I would fall apart! 


My last big piece is my tech folio. I was lucky enough to come across this leather bound one on eBay [available here] It fits everything from my ‘problem’ notebooks, iPad Pro + keyboard case, and all my gadgets, neatly and securely.


Snugly in my folio I keep my Apple Pencil, my rose gold mophie powerstation, lightning port/usb/usb-c enabled flashdrive (which has been a lifesaver for PowerPoint presentations),  misc cables, and my student ID card.

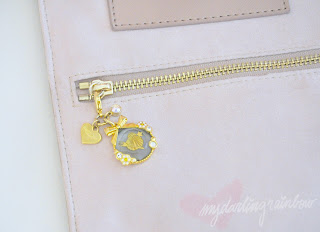
I also replaced the zipper with a Samatha Thavasa x Disney’s Little Mermaid charm that I thought was too cute, and which gave my folio a little personal touch. 


My main tool for school is my iPad Pro + Apple Pencil. I write all my papers on it, take notes, access and turn in my homework from it, and get onto my school’s app on on small and portable device. 


The main apps I use are Canvas (which is where my teachers post the homework, lecture notes, and my grades), Word documents, PowerPoint, Quizlet (digital flash cards), Ginger (which is a proof reading app and how I was able to get the highest grade my english professor gave out last spring), and Notability (the note taking app that I rely on for everything).


I switched over to notability last semester, mainly because I had an intensive lecture class and needed to record what my professor was saying for review. At first glance notability looks like every other note taking app, but what won me over was the fact that I can also record audio while I write notes and it date/time stamps each recording. Also, it directly links with canvas and it’s pdf files and I can load up my professors’s lecture files straight into the app and write notes on top of the files. It just makes note taking so easy!


My last little bits in my bag are my personal items. I keep a reusable straw, tissues, a card holder, small wallet, SPF hand cream, the best Bluetooth headphones from TaoTronics (seriously), my phone [custom case from TheAmethyzt] , and my YSL tint-in-balm and a small vial of my Lolita Lempicka L perfume. 


I wanted to show off my cute pink glass boba straw from DrinkingStrawsGlass, and my protective casing from CashandDella. My city is making plastic straws unavailable so a good reusable straw is a necessity, especially for milk tea stops! I hate the taste of stainless steel, so glass was the best route for me and I love it!

Down the road I would love to be even more compact, but these are the items that work best for me! Maybe it’s good inspiration, or for a peek into how someone else lives their school life, maybe there’s something of interest that can inspire a modification to someone else’s school supply list? Regardless of the reason I hope that this entry was an enjoyable read!

<3CarisseIris