Showing posts with label disney. Show all posts

Sunday, September 9, 2018

Ribbon T-Shirt Dress~ DIY


It’s been awhile since I did a proper fashion DIY! 
I was so excited to take on this project because it ended up being so easy, and no sewing required!


What started this obsession with ribbon t-shirt dresses were all the J-fashion apparel I’ve been seeing with similar styles over the past 2 years. Like most niche  things, I didn't see any designs that I necessarily wanted. Since the first iteration of this dress I saw was a Disney, The Little Mermaid, featured item, I had cemented that I needed my own Disney related ribbon dress too!


Like most of my outfit ideas, I have to sketch it out properly. Following my J-fashion inspirations, I wanted ribbons to lace down the sides. I also wanted to add some extra flair, and decided to see how a ribbon lacing over the shoulder would fair.


I’ve had a Powerline, from A Goofy Movie, shirt for a few months now that I never could figure out how to wear. So, I set that up to be my experimental shirt for this blog.


Items needed:

T-shirt (preferably on the longer side)
Ribbons (for my design, I had a lot of places to use ribbon and added length, so I used a bit over 21 ft)
28 extra large eyelets
Extra large eyelet tool~ I bought 10 eyelets + tool in a pack
Hammer
Scissors 
Marker or fabric chalk
Concrete work surface !

Optional:

8 extra large eyelets (for shoulder detail)
Wrench, to hold the eyelet tool

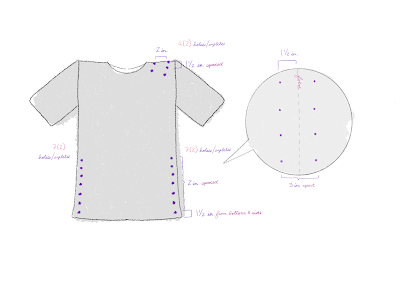
So, to make my t-shirt dress, I came up with a game plan! 

2 rows of 7 eyelets on each side~
First one starting 1.5 in. from the bottom, and each eyelet is spaced 2 inches apart. 
The two rows are spaced 3 in. In between. 


I marked out all my measurements, and placed a dot in marker where I wanted to place my eyelets.


For the shoulder detail, I picked a random placement on the shoulder, diagonally.
I spaced a line of 4 dots 1.5 in apart.
Then, 2 in. over, I repeated the same process.


After creating my dots, I made a small incision with my scissors on each dot.

The hole should be just big enough to squeeze the raised tube of the eyelet into! Any bigger and the eyelet can fall off.


This is an eyelet~
It has two parts, the tube disk and the toothy side.


The eyelet tool consists of two parts, the base and the mallet.
The eyelet should fit perfectly into the eyelet tool for a snug application.

To install the eyelet, make sure the fabric is inverted!
On a clear concrete surface, place the tool base.
Place down the tube disk, tube up.
Stretch the hole in the shirt over the tube. (The bottom of the tube disk is the pretty side, so you want to make sure its on the visible side of the shirt).
Place the toothy side over the tube, sandwiching the fabric.
Put the mallet over the eyelet, fitting it snugly into the tube.


The eyelet +fabric sandwich should look like this.


Installation seems to only work on a clear concrete surface, trust me on this.
Double check that the eyelet and tool base isn’t resting on any part of the other side of the shirt (the shirt will get destroyed if you hammer on it, it happened to me!)
Then, take your hammer, and hammer hard a few times on the mallet!


A wrench, or any gripping type tool, is great to hold onto the mallet for those who are scared of hammers +fingers or extremely clumsy.
Once I figured out that I would hurt myself less and hammered harder holding the mallet with another tool, installing the eyelets went so quickly!


After all the eyelets are installed, threading them with ribbon is the easiest task!


Voila! A cute ribbon t-shirt dress! 


My finished coordinate looked exactly like I sketched out. I was quite happy with my handy work. I love that it’s a perfect mix of casual and cute! Also, that I can now turn any boring screen tee into a cute statement piece! 


Now, I can do the same thing to my mermaid lagoon shirt that I bought to perfectly compliment my style! The options are now limitless on how I can thread ribbons onto my clothing!

<3CarisseIris 

Saturday, August 25, 2018

Imagination Unlimited~ The Jim Henson Exhibit


The Skirball Cultural Center in LA has been hosting a fun new exhibit this summer centering around the works of Jim Henson! A small fact about me is that I absolutely adore puppeteering/muppets! (I may have a custom muppet in my ownership and created my own a few years ago;;) So, hearing that this exhibit is showcasing near to me, I had to see it in person before it moves somewhere else.


The Jim Henson Exhibit condenses and showcases Jim Henson's Work and process of creation from the start of his career, and though different chapters of his life. On display are diagrams, sketches by Jim Henson and his creative crew, muppets and various props from multiple Jim Henson properties.


To greet those at the entrance is the actual and iconic Kermit the Frog. I was already emotional knowing that I would see these muppets in person, so embarrassingly I did tear up slightly encountering Kermit. There’s something quite precious meeting these creatures that played such a big part in my childhood. Moving on to the next section, Sesame St., was even more amazing!


Encountering the Sesame St. muppets and taking a peek into their creation was wonderful! Seeing how something so simple like ping pong balls and felt could create such memorable-lifelike  childhood friends just awed me. I could almost believe that magic exists and that these puppets could come to life at any moment!


The Slimey the Worm set up genuinely surprised me at the sheer size of the sets the little worm used, also at the actual size of the worms~ I asked my puppeteer friend who accompanied me to help show the true scale!


The next section of the exhibit is devoted to The Muppet Show~ It housed some of my favorite muppets like Scooter, Beaker, and Dr. Bunson! Not to be a broken record, but it was absolutely wonderful to meet them in person! Again, I couldn’t believe how simply they were composed but how effectively they sell sentience!


Something absolutely wonderful to see in person was Miss Piggy’s iconic gloves! Also seeing some of Miss Piggy’s props which I wish to own for myself~ Fun Fact; Frank Oz, the voice of Miss Piggy is also the voice of Sam Eagle, Animal, Cookie Monster, and Fozzy Bear.


The final section of the Exhibit covers other properties created by The Jim Henson Company. Titles with creatures and props featured are; Fraggle Rock, The Dark Crystal, Labyrinth, and The Muppets 3D.


The Dark crystal had a larger presence of puppets and props displayed, the fabrication of the creatures For the film were very different and amazingly detailed in comparison to Henson’s previous creatures and definitely was wonderful eye candy! There were so many different textures and little intricate features that add to the additional visual depth of each character!


The Skeksis was one of my favorite pieces on display! Even though the Dark Crystal wasn’t one of my favorite films, I have to say that the Skeksis has to be one of the most beautifully crafted creatures!


Sadly, the photos of my favorite film Labyrinth, were corrupted. From Labyrinth, the costumes and mock up of the sets were on display. Seeing how the sets were created and the beautiful layers of the costumes fueled added adoration for this film. It is a bit disheartening to not be able to share more of the Labyrinth displays, but I was lucky enough to salvage the main piece, Sarah’s masquerade ball gown!


Though, the exhibition was a bit small, it was definitely worth visiting! The exhibit seems to be touring worldwide so there is definitely opportunities for those interested to experience it in person!

<3CarisseIris

Sunday, December 6, 2015

Recent Disney Nails

I love getting my nails done, it's one of my vices, just like fake lashes and hair extensions~

Since July I've been in such a Disney mood, and my nails are definitely reflecting that.
Back in October, I had my nails done to match my Wendy Darling inspired costume.
 I like to call them my mermaid lagoon nails. They feature one of the Neverland mermaids, watercolour style nails in a colour scheme taken from the aforementioned scene in Peter Pan and detailed in gold trails of fairy dust. They looked quite magical and it was sad to part with them.

Back in July, I had Rapunzel inspired nails that actually glowed with NFC led lights that triggered when I received a phone call or text message or activated the NFC function on my phone. Details included parts of Rapunzel's dress, the Disney princess herself, golden hair, and of course lots of flowers.
I have a video of the lights in action [here]

My latest set for December is on the more muted side, being inspired by Cinderella.
I wanted something pretty, sparkly and feminine.
 Some key details are holographic pieces all throughout the nails, open space designs, and silhouettes of a waltzing Cinderella and one of her pumpkin carriage. The light colours and pearl details are also befitting of winter and remind me of snowflakes, and look so pretty and bring the look full circle.

A fun little touch is the hidden Mickeys on the underside of my nail. I never usually see under nail art, and the  little hidden gems are a nice touch of something unique to my nail set.

I hope you enjoyed seeing my recent nail art.

All my nails are done at Atlas Studio.
I've been going there for almost 6 years now, and I'm always so impressed with the work and atmosphere.

<3CarisseIris


Thursday, December 3, 2015

Magical Disney Themed Mobile Backgrounds

As a fun treat, since I've taken such a long break~ I thought to share some backgrounds I made for my phone this year.

Usually, I tend to share on my tumblr, just the ones I didn't end up using, but I decided to compile all those and the actual backgrounds I've used, for fun.

If you have a samsung phone, I have a run down on how I customize my phone [here] and [here]

As an example here are few examples of my phone setups


 The last one is my current phone set up for winter~ though I think I need to mess with the tone of my keyboard to be more on the blue side now I see it on my laptop...

Anywho; here are the backgrounds I put together~

Little Mermaid
 Cinderella
 Mermaid Lagoon


 Daisy Duck/Floral
For funzies


<3CarisseIris