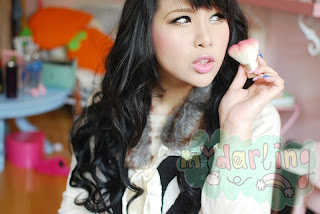
So, sometime this summer I figured out a way to erase years off my face, and make heavy makeup look less intense. The result ended up looking somewhere in between innocent and a bit sultry..
Main products I used:
Etude House, Personal Color Palette, Warm Tone Eyes
Jill Stuart duo, 107, In Love with Love
PeriPera Ink Color Cara Mascara, in Dry Rose
YSL Touche Eclat Glow Shot, Sunset
YSL Glossy Stain, 220
YSL Volupte Tint-in-Oil, Love Me Nude 11
The most used and loved palette I have right now is my Etude House Warm palette~ it's good mix of sheer shades that are build-able and easily blend-able! It's not very suited for those who don't like sheer/natural eye shadows that tend to be found in a good amount of Asian cosmetics, but I find I enjoy the look of them a lot! It fits the soft, romantic, effortless, eye look I want to have.
The shades used are:
W1, Honey Milk - matte warm taupe
W6, Spangle - chunky glitter beige
W8, Dull Espresso - matte deep brown
W11, Toasted Pecan - matte peach taupe
W13, Cream Tea - cream shimmer
The main focus of the look is the eyes~ The look is a large and rounded 'doe' eye, but with a sultrier appeal to them.
I started with a clean lid, and primed my eyes with the cream shadow of the Jill Stuart duo.
1. Crease: Taking 'W1', the lightest contour colour, blend it in a windshield motion along the eyelid crease. This will serve as a way deepen the depth of the eyes and as a way to create a more seamless and blended eye.
2. Inner + outer corner: Using a mid tone matte first, for me that was 'W11', and blend a bit of shadow onto the inner eye lid and outer crease to further deepen the contours of the eyes. This will create a rounder eye shape. If you want to enhance this shape even more and amp up the sultriness, take a deep brown shade, 'W8', and blend the deeper colour onto the outer corner of the eyelid.
3. Eyelid: I take an eye shadow that is lighter than my skin tone and will catch the light nicely 'W6' and load it onto my fingertip [usually my ring finder of my non-dominant hand, as it's the most gentle finger to use around the eyes] and tap it right into the center of my eyelid. This serves a a highlight to further the perspective of an rounder eye shape and really deepen the contours created in the steps prior.
4. Lash line: Using the deep brown eye shadow, 'W8', and a smaller brush or applicator, smudge the shade along the lash line to give the appearance of natural shadows from your eyelashes and to create the look of a thicker lash line and to add a smokiness to the look.
5. Eye bag: Instead of smoking out the lower lash line I used the middle shade contour shadow, 'W11' to again intensify the 'doe eye' look. I blend the shadow along the natural crease under the eye. This will add the illusion of larger eyes by adding a few millimeters to the eye area not to mention giving more space vertically on the face to the eye area.
6. Under eye: I use a light shimmer, 'W13', to finish off the eye shadow portion of the look. It adds a 3D volume to the lower lash line to make the contour look more believable. It also makes the eyes look a bit puffier which gives a fragility to the look.
The next trick is lightening the lashes. It sounds a bit counter productive, but it is the highlight to the look and what actually captures peoples attention (especially in person), and lessens the heaviness of the eye makeup.
The shade I chose is the shade of my hair colour/ lighter than my natural lashes.
Like all my looks, I add top and bottom lashes! Ill be 100% real, I don't love these lashes at all but they were the only light brown shade top and bottom lashes that I found locally and looked pretty decent. I would probably recommend looking around on Amazon or eBay for nicer ones.
You could probably get a similar look by very carefully prepping and colouring normal (black) false lashes with the coloured mascara.
It's hard to show the true colour of the lashes, so here's a photo from my phone in direct sunlight.
I finish everything up with a bit of YSL Glossy Stain, 220 to the apples of my cheeks and my lips for a natural flush of colour, a touch of YSL Touche Eclat Glow Shot on the high points of my cheeks for a slight glow, and YSL Volupte Tint-in-Oil to serve as a lip gloss.
Then, that's it!
A very contradictory look. Or what I like to envision it as an innocent look with a mysterious undercurrent~
<3CarisseIris


