Showing posts with label pink. Show all posts

Sunday, October 7, 2018

Cute Halloween Decor~ DIY


It's finally the most wonderful time of the year! Spooky season! The only problem, is there's no catering to my specific niche of decor. So, this year, I finally vowed to resolve this issue and make Halloween decorations to my liking~


First things first~ Buy the supplies. I went to my local craft store and they were having a big sale and on top of it I bought all the defective decor for an added discount on top of it~ I mean, I'm already going to fix them up, so a few extra steps or missing components don't bother me.


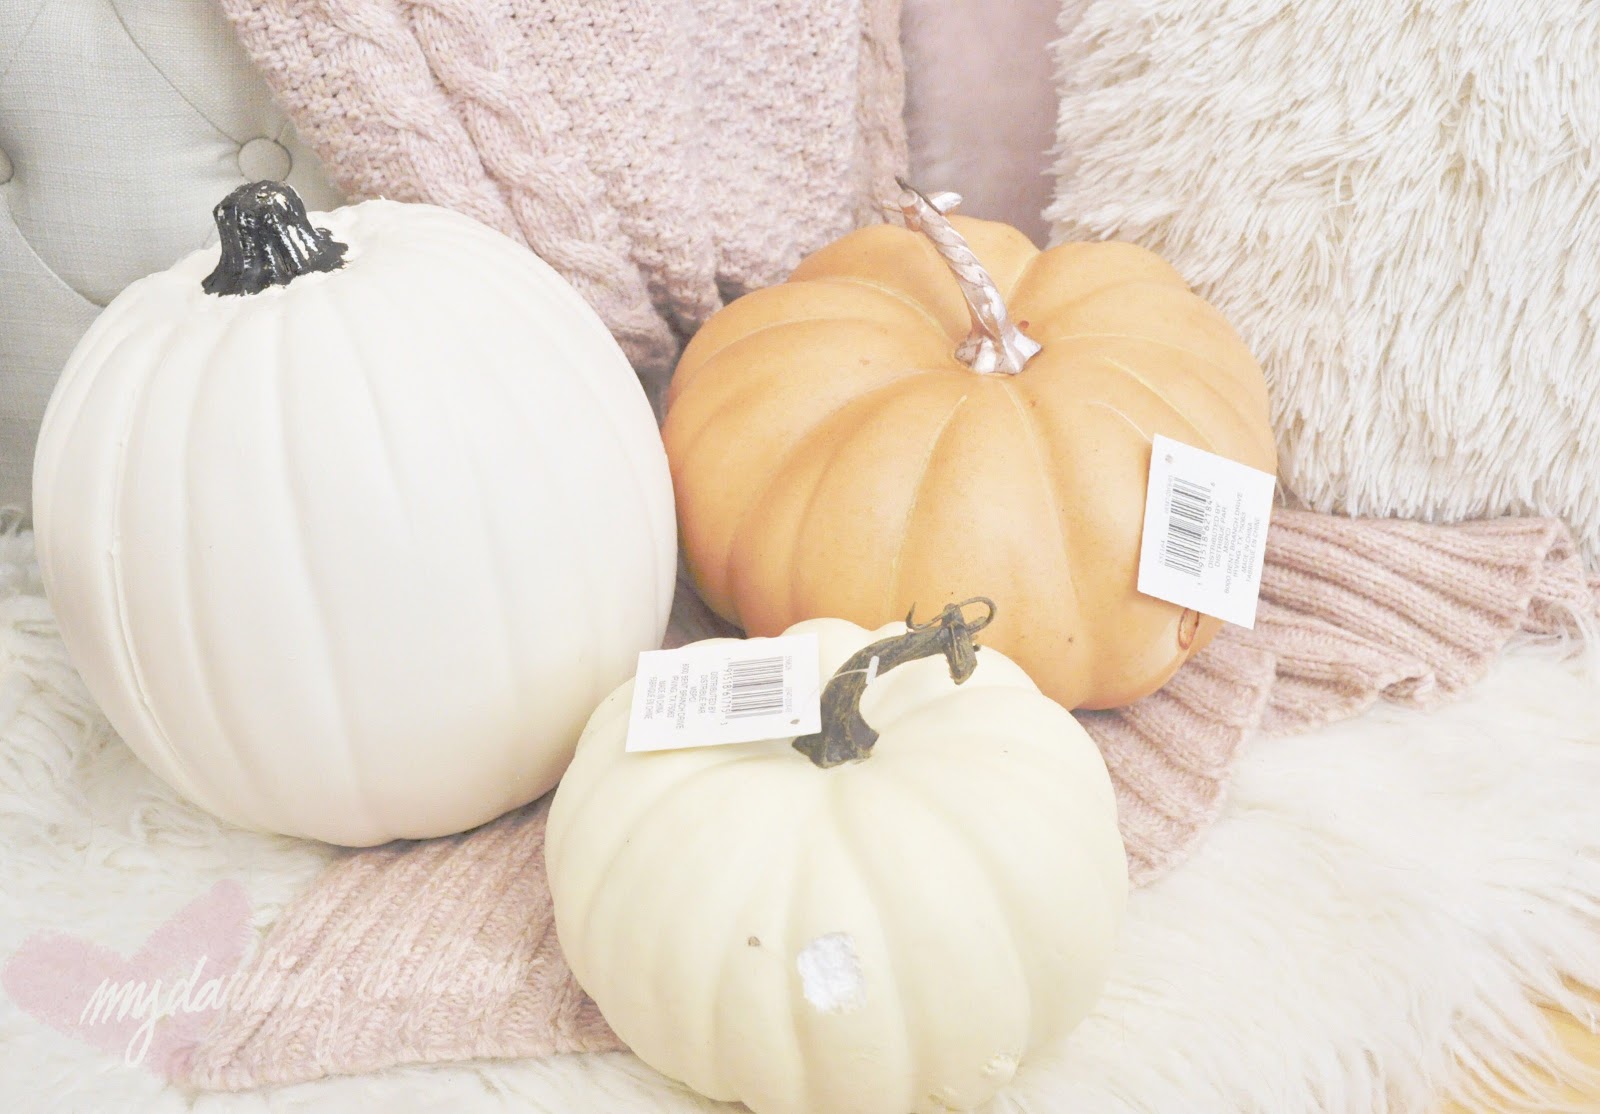
My main pieces are a foam tombstone (non-working light function), skull (with a big crack/dent on its underside), and 3 pumpkins (that a kid actually tried biting into and successfully took a few bites out of).


My arsenal of choice for this project are:

Spray paint primer!!!! (super important)
Spray paint of choice~ I chose an off white and a light pink colour
Acrylic paint for small details
Paint brushes

[[not pictured]]
exacto knife
sand paper


Since my little pumpkins had big chunks taken out of them, I needed to fill them in and chose to try this Wood Powder Clay from Daiso instead of my usual paper clay... I actually ended up hating this wood clay. It dried to the same styrofoam texture as my props, but it didn't paint well, or sand down well at all! So, I don't recommend it.

My choice for filling in small props is proper paper clay, which I ended up going back and doing later...


With my larger pumpkin, I eyed it for a certain reason~ it was hallow inside! I kind of wondered if I could turn it into a vase, so I cut off the top with an exacto knife and filled it with water to test if it was leak proof.

Thankfully, it is! So, I could happily follow through with my idea!


After finding an area that was well ventilated and suitable for spray painting, I got to work spraying everything with primer. (Since the skull is plastic, I sanded it a bit before priming, optional but it helps give the primer better adhesion.)


I also used this time to see if a primer would melt the styrofoam tombstone. Most spray paints have compounds, I believe alcohol of some sort, that can melt styrofoam. So, I was hoping a primer would help against that. The primer went on without a hitch, so I gave it a good 4  layers of coating.


The pumpkins I was less worried about melting as they seemed to be a sturdier foam and were coated in a durable exterior. So, I sprayed them in a primer first, then after drying, I sanded down the areas where I fixed them to make the transition from clay to foam smoother.

Sanding in between layers of primer will help make an even smoother surface in the end product, and can really make a vast improvement on a spray painting job! The best example in the end is my skull, since I spent a lot of time on it doing it right!

I like doing 2-3 layers of primer, just to make sure everything is well coated and and as smooth as I can make it.


After the last priming coat dried, I got to work doing multiple light layers of my colour of choice.

Doing many light layers can be pretty time consuming, but it makes for a better result, trust me! Plus, it dries faster!


For my poor tombstone, the spray paint still managed to eat though it very badly in some areas, especially where I accidentally got a bit heavy handed. I almost gave up on it then decided to use some of my paper clay to fill in the worst areas, which worked semi-decently... But, the spray paint still managed to eat though more of my styrofoam as I continued on afterwards...

I thought that spray painting this would save me more time rather than hand painting it with acrylic paint, but boy was I wrong!!! If I ever do this again, I'd rather just suck it up and take my time sponging acrylic paint onto styrofoam.....


After letting my pieces dry and have a few extra hours to cure to harden up, I had these lovelies!
I could probably happily stop there, but I wanted to add bit of flair to some of them.


Using my rose gold acrylic paint, I dry brushed thin layers of paint onto my pumpkin stems, and onto a tooth of my skull. Doing thin light washes of acrylic I found is the best way to paint objects without any sign of brush strokes or uneven coating. After 6 or 7 passes, the paint will be nice an opaque!


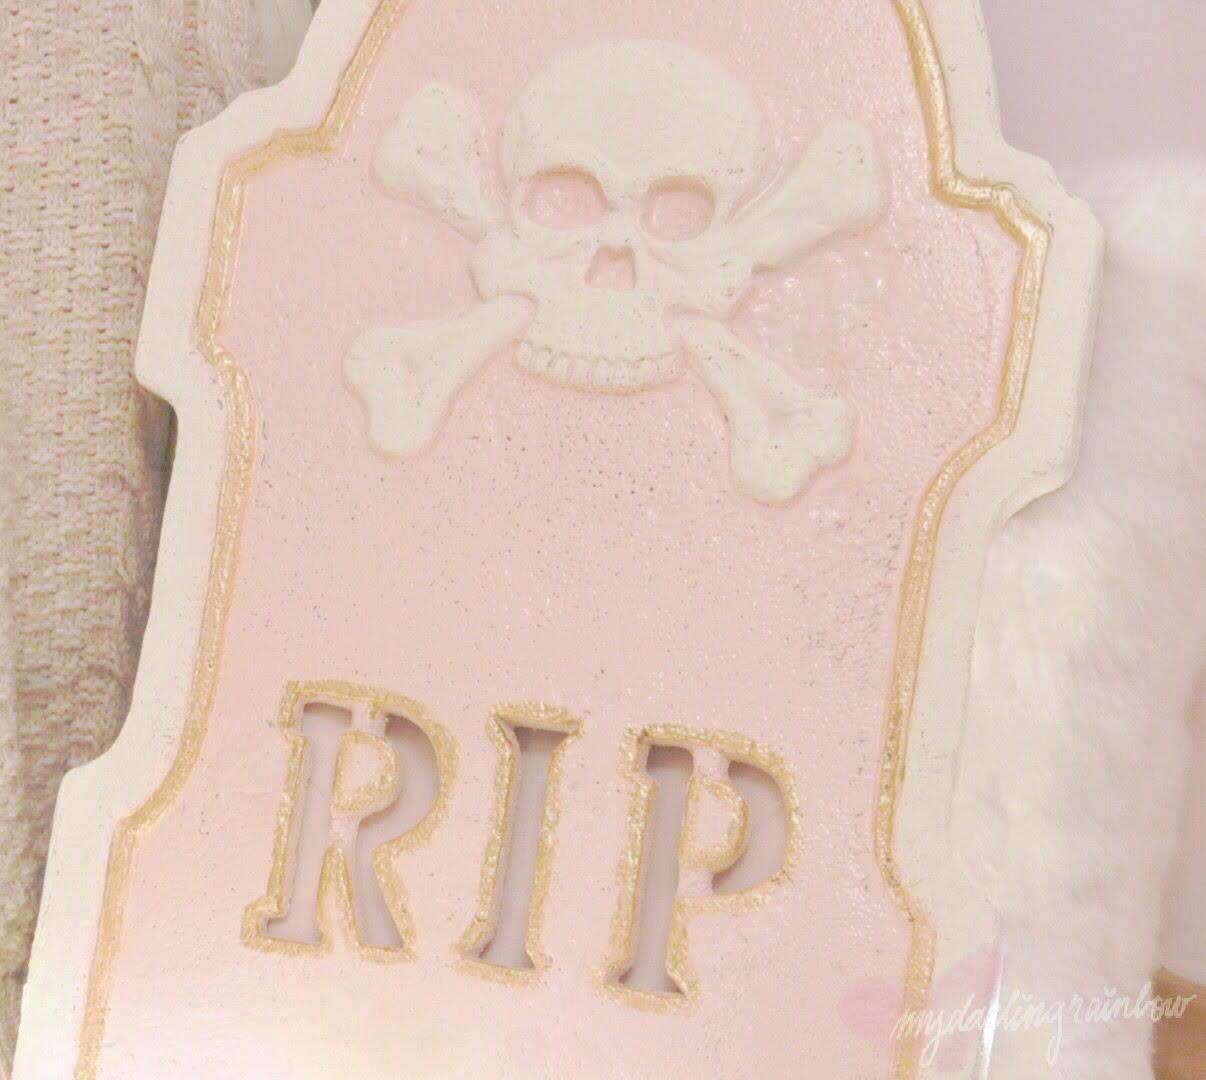
The tombstone got the same treatment, but with a white acrylic paint I had laying around and the same rose gold paint for accents.


Then finally my babies were done!


The cute and spooky corner of my bedroom!


Before I could call myself done, I wanted an extra little nod to the fall season with a runner for my coffee table. Since I couldn't find any that I liked and that fit into my aesthetic, I decided to make a simple one with some lace and a pretty burlap ribbon I came across.


I easily hot glued the lace onto the burlap, and used more hot glue to faux hem them together.


For a super quick job, it came together very nicely!!


With the table runner, and some roses put into my pumpkin vase~ my table is ready for the fall season!


Finally, I can feel satisfied with unique Halloween goodies that reflect the proper spooky ambiance that I adore, and without looking too out of place in my life.

I really didn't think that doing something like this would be so easy, and take up only a day! I'd like it to be known that it isn't actually as intimidating as one would think to take on this kind of project and I highly recommend it! 

So, may the Great Pumpkin bring everyone holliday cheer, and maybe leave out some treats for the spooks in your life!

<3CarisseIris

Sunday, September 30, 2018

So, I have a Pink Nintendo Switch


With Pokemon Go Pikachu and Go Eevee announced, I decided now was the best time to justify purchasing a Nintendo Switch. Though, if I wanted a Switch, I knew I would only find it worth it if it was one I actually liked the look of. I mean, the initial investment is pretty high, especially coming from me who isn't used to buying games or consoles. 

After some googling and review searching, I decided to purchase my Switch though ColorWare Inc.

ColorWare Inc. is a website that sells different gaming consoles, mobile accessories, and other bits of miscellaneous technology~ but with the option to customize the colourway it can come in. With a lot of positive reviews and photos of their handiwork, I happily and confidently decided to order my own pink edition of the Switch from them.


The colours I decided on were an arrangement of the metallic shades, diamond and glamour, but in a matte finish (I read multiple opinions online of people recommending and pushing matte finishes for hand gaming accessories because apparently they're easier to keep looking clean/finger print free).

I ordered my switch on June 26, and it arrived July 18th~ which was just within the 2 month estimation given to me upon ordering. 


The Switch arrived in it's original packaging and nicely put back together. I was happily surprised with the extremely professional way it was presented, and doubly surprised at the high quality work my Switch had upon opening it!


Dun dadun dun~ Let me officially show off my pink Switch!

I have to admit that it looks prettier than anything I could have ever imagined (especially from my assumption that it may be a deeper pink, from the product colour generator and that there weren't many examples of what glamour pink looked like).


ColorWare Inc.'s work is absolutely superb. The colours are clean, with no blemishes or imperfections. Every line is crisp, and every surface completely opaque. Especially with my tough handling of my console, there are no external signs of ware that would belie that pink wasn't it's original colour.


Some of the first accessories I purchased for my console were thumb grips. Since I play Splatoon 2 quite often, I figured it would give me a bit more traction and control on the joysticks. Also, with all my game hours, the pads of my thumbs were starting to turn red and a bit raw from unnecessary friction. So far, it's been a decent aid in saving my thumbs, well, in addition to newfound moderation. I also have a Vanfit screen protector to keep my screen scratch free, extremely handy when my Switch is tossed into my bag and finds it's way next to my keys...


With other games, like Mario Kart, Mario Party, and Smash out and coming out, I figured that getting some extra Joycons might be a good idea. Plus, it would bring forth more enjoyment from those games, as I could include more friends into the game. So, I went back to ColorWare Inc. to order a complimentary pair to my Switch console. 


My Joycons arrived just 2 weeks after placing my order and they were just as beautiful as my main system. I ordered an opposite set to my original Joycons, so I can switch out the colours if I ever wish too play around with the look of my system.


With new Joycons, I started looking for some Joycon grips to have for myself and a +1. With my own Joycons, I haven't really liked the standard grip that came with my system, so I wanted to find a set that had a smaller profile (since I have small hands) and that matched my Joycons. I found the perfect set from Dream3DPrinting on etsy. 


The grips arrived in roughly 3 weeks from the date I ordered them. The grips are 3D printed, and very smooth to the touch. They have a slot where the Joycon slides in smoothly and fits very securely. In addition, something I absolutely adored was there was an additional slot in the back to also hold the Joycon straps, which makes storage very convenient. 


To account for my extra Joycons, I needed a way to charge them when apart from the main system. So, I found the PowerA Nintendo Switch Charging Dock, which conveniently charges all 4 of my Joycons.


When docked, a LED light showcases the status of my Joycons and when they're fully charged. Plus, it serves as convenient storage for when my system isn't in use.


Though it may not look it, I have done a small additional add on to my Switch dock. With all the research I did, I've found people have had issues with the front section of the dock scratching the glass of the Switch. Viable popular options to negate this issue seem to all be types of dock sleeves, but since a sleeve would cover up my pink dock, I wanted to find another option in prevention.


I then came across SwitchSafetyStrips on etsy, who sells pre-cut felt strips that apply to the inside of the Switch and cover up the area that has been said to scratch the screen of the hand held console. I like that it's subtle, effective and it keeps my Switch firmly in place within the dock. I ended up only applying the strips for the front segment, as having felt strips on both sides felt too tight on my switch as it had the extra bulk of the screen protector.


As I'm on the subject of the dock, I want to move into talking about how I connect my Switch to my television.

My TV only has one HDMI port, and originally I used it for my Chromecast. So, I needed an option to have both hooked up, and convenient to access (since my port is behind my TV and accessing it requires me fully dismantling my television stand). Thus, I was forced to figure out my own way to solve this issue. 

My solution was the Sewell IBIS 4k HDMI Switch Box and Rose Gold Male to Male HDMI Cable. The HDMI Switch Box connects to the HDMI port, and gives it an accessible dual extension. Though, it only connects one device at a time, but switching back and forth between devices is as easy as pressing a button, pictured above


Also, the Sewell IBIS is extremely small, and is easily hidden from view.


My newest accessory addition, is a casing for my Switch. I still haven't found the perfect case, but as of right now, I have settled on a clear bumper for my console.


The clear casing works just fine, but it doesn't protect the front of my system and my joysticks do get a bit jostled about in my purse. Though, I do enjoy that the case is segmented in 3 parts, so when I go to disassemble of the Switch or go to place it into the dock, it's very convenient. Still, it would be great if there were better cute storage options available for the Switch console.


At the end of the day, I'm so happy with my Switch, and that I've finally joined the new Nintendo bandwagon! If only Nintendo released an official pink system initially~ but at least attaining one was possible. Regardless, I'm so satisfied with just how well it all turned out!

I know that there was a lot of curiosity about my Switch and my accessories, so I hope I was able to answer any questions that were initially sent my way. Though, I wish I could properly answer this question, but I can't say I have many game recommendations~ As of now,I only have Mario Kart, Splatoon2, and Breakforcist Battle (which is a cute block busting game). Besides, Pokemon and the upcoming group game releases, the only title I'm eagerly awaiting is Katamari. Outside of those, I actually have no idea what type of games I would like;; I'm still very much a newbie outside of MMORPG's..

So, any games for the Switch you love/recommend!? I'm actually very curious to what other people enjoy!

<3CarisseIris