Sunday, December 21, 2014

Blanket Fort Magic


Once again, I start a blog post  with an appology. My laptop's been broken for over a month and I have yet to fix it... I'm going to try blogging for a bit with my phone to see if its a decent replacement in between. If the quality it too poor or distracting, please don't be too shy to tell me so.

This winter has been a bit hectic, but I was able to throw a holiday party for my friends and part of it was a slumber party so I made a lovely blanket  fort that encompased my room.


After years of practice building blanket forts, I finally found a way to create an easy and cheap fort that looks impressive and is spacious enough for a good amount of guests.


Surprisingly, I used a cheap and very unconventional 'fabric' that was so perfect for my fort,  Plastic Tablecloth! I was able to find 300 feet online for roughly $20USD and I'm sure with more searching you can find a better deal. For my fort, I used baby pink and cream for a cute effect.


To start, I tied long peices of plastic tablecloth to my chandelier to anchor the fabric to something. Doing so, I made sure to unplug my chandlier to keep it from going on and becoming a fire hazard.


I then used string, I had pink yarn at the tine from Daiso so I used that, and lots of knots  and clothes pins to string the yarn around the borders or my room and along my walls. I then tucked the fabric behind the string to create the fort or tent shape. It did take around 3 hours to put up but it was quite easy to create and  so worth the effort!

Of course, I finished it off with  one box of decorative lights, and it made the fort not only look more magical, but served as perfect lighting for the room.


Once my friends came to enjoy, I felt quite accomplished. The best thing to  do in a blanket fort is wear onesies, drink hot cocoa and watch Netflix~

I hope you enjoyed my semi tutorial on how I learned to construct my blanket fort and you cold find a few tricks that were applicable to you....

Again, I will  try better to keep updating my page, and be a better blogger. ♥

<3CarisseIris

Saturday, November 1, 2014

Monster High Halloween Looks

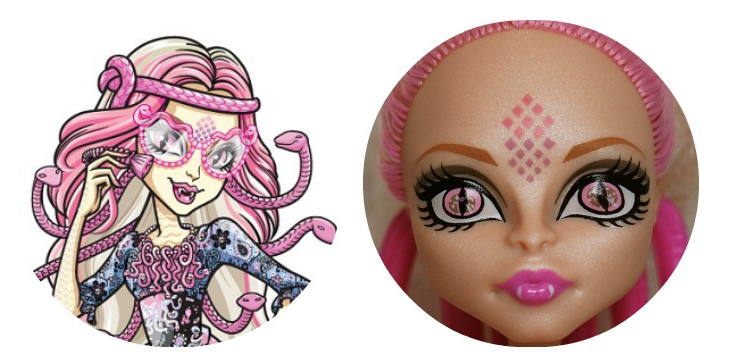
Halloween is my favourite holiday, and besides going all out for Disneyland every year, I like to put my all into actual Halloween night looks too.  This year I wrangled up my friend to dress up with me and we decided to be Monster High dolls. The night before we were looking at the different dolls finding ones we could pull off decently and we decided on Twyla, who's a boogyman and Viperine Gorgon, who's a gorgon [like Medusa]. 
I'm not sure if anyone loves seeing how people create looks, but I personally love it and thought, 'Why not!', and just share on here how I create my makeup looks...

I always start with some idea, for these looks I was lucky enough to have a lot of pictures of the dolls also the animations and screen grabs. So, I take those ideas and make a bunch of face charts.
 
I usually end up making 2-4 face charts per look, for face charts I always make my own and photo copy the blank face, so it's easier and quicker for me to just colour on it to map out my ideas. Above is the look I loved the best and ended up going with for my friend.
The description of the character is said to have grey skin, but the doll is much more lavender in colour so I ended up air brushing my friend with a lavender base then whipped up some grey/blue powder to set it, to give her a mix of both and the colour turned out just lovely. All her contour was done in navy and grey so to blend nicely with the periwinkle skin tone. I also airbrushed her hair, but it didn't show up so well on camera so I did retouch it and her iris' with some photoshop. Luckily her doll's makeup is very basic and I went with a classic cut crease + winged liner combo and finished it off with some Dolly wink lashes, top and bottom. The bottom lashes I coloured with blue eyeliner.
For blush, I went with a berry colour mixed with a touch of peach just to make her look a bit less undead.
For some reason, I picked Viperine because she looked the easiest, plus airbrushing my own face is a bit tricky for me.. The exact eye shape is hard to pull off neatly on my eyes especially because my inner corner of my eyes are hooded, plus I didn't want the look to appear clown-ish or very over drawn.
Immediately in my head I knew that I would be using Adore Delano as partial inspiration because of the way she draws her inner eye corners, Bianca Del Rio, for the way she draws her crease into her nose contour and then realized the way AV gals do their lower lash line would work well for the look too, so I put it all together and I figured out what I was doing~
After two face charts, I decided that instead of going with a taupe eye, like the doll, I would go a bit extreme with golds and bronze colours and it would be more exciting visually. I also changed the scale colours to fit that idea better so those became a mauve and orange for the look.
For my base, I mixed my foundation with a very shimmery eye shadow [I went out to buy some Wet and Wild shimmer for it], for up close the doll has a glittery and shiny base colour so I wanted to replicate that. I then contoured my face in the extreme with a bronzer and other shimmery copper eye shadows that I own then went in and highlighted my face with the same shimmer eye shadow that I put into my foundation, even some very pigmented gold shadow at the highest points of my face.
I drew the scales with some lip liner then filled it in with a bit of eye shadow.
 The eyes are an extended cut crease. The liner is winged and extended down past the tear duct. The lower lash line is dropped, then is extended under and past my natural eye line. I have on house of lash, top lashes and Dollywink bottom lashes. 
If anyone's interested [these] are the contacts I'm using.

I'm pretty happy with how these looks came out, way better than I was expecting, but they still do need some work if I ever decide to recreate them... 

If anything, I hope you enjoyed the peek into how I create my makeup looks. And yes, I even do face charts for when I do simple looks like my Roxanne costume and sometimes even my gyaru looks when I feel like trying out a new eye shape.. They're a great visualization for me and I don't have to waste my makeup on them.

Hope everyone had a fun and safe Halloween!

<3CarisseIris


Sunday, October 26, 2014

DIY Belivable Costume Braces.

After scrounging online, my friend [who I use in this tutorial], and I weren't able to find how to make believable, yet at all, safe, braces for her costume, or even find ones that were affordable, believable and custom fit, so we took it upon ourselves to figure out a way to create fake braces for her costume this year.
This tutorial, is actually pretty easy but it does take some time and effort, but it's completely worth it because not only is it sturdy but reusable for whenever you might need them to take a costume to the next level!
 What you will need:
Scarecrow brand vampire teeth, the shortest ones [specifically this brand because it comes with plaster, which is important to the braces]
26 gauge wire
Earring backings, 'butterfly' earring backs
Orthodontic wax, which you can usually find at drugstores
Sandpaper or file [not pictured]
Wire cutters [not pictured]

Let's get started!

1. Put the vampire teeth on the specified teeth, do not fit them yet, and eyeball how much you need to file the teeth down.

2.Use the sandpaper or a file to file the vampire teeth down as much as you need.

3. Follow the instructions, and fit the teeth.

4. KEEP THE LEFTOVER PLASTER, you will be using it later.

5. Use wire cutters and cut two long pieces of wire, with a bit of give... We didn't measure but eyeballing it, roughly between 6 and 10 inches, just to be safe.

6.Take one wire and 's' it though a bracket, pictured below.

 7. Take the second wire and 's' it the opposite way.
 8. Secure the bracket by twisting the ends of the wire a few times, pictured below.
 9. Repeat with the other earring backs to create more brackets. You will need a bracket for the two vampire teeth and the teeth in between.  [we only needed 6 brackets in total]
         -for note:
              Before doing the next bracket, check in the mirror with your wire and first earring back against your teeth and guesstimate where the next earring backing needs to be placed on the wire so your brackets are as well aligned as they can be. Repeat checking between every bracket.

10. Leave about an inch and a half of wire at the end, this will make the braces look like they continue though the whole mouth.

11. Add a bit of orthodontic wax onto the end of the wire to protect your mouth against sharp edges.

12. Put on your, now fitted, vampire teeth.

13. Align the brackets and wire to where they should be; a bracket to each tooth and the end brackets should be on your vampire teeth caps.

14. Shape the wires so the brackets lay as close as possible to each tooth, and fit comfortably to the curve of your teeth.

15. Apply a coat of left over plaster to the back of the two end earring backings [brackets]. Make sure the vampire teeth caps are dry and stick the brackets onto the two teeth.

16. Hold the plaster coated brackets in place to your teeth for at least 30 full seconds.

17. Keep the braces in your teeth for 2 minutes. Please keep your lips from covering the teeth and interrupting the brackets setting.

18. Just keep smiling, for those two minutes.

19. YOU ARE DONE.
 You now have a pair of reusable and believable costume braces!
Put in and remove your braces by using the vampire teeth to handle them, since they're the most secure section.

Please do not eat or drink with them on, unless you drink with a straw, otherwise you risk damaging the braces you created.

You can also store them in the case the vampire teeth came from, which is pretty helpful to keep them debris free.

Enjoy your new braces, and I hope this tutorial was helpful to you~
Have a happy and safe Halloween!

<3CarisseIris

Saturday, October 11, 2014

Long Time no see!! This is what I've been up to~

I've been working on my halloween costume, and parts for my friend's costumes, this whole month and a half~
Roxanne, from a goofy movie<3
[and her friends~ Pistol, Beret Girl, and Stacey]
4 years ago, my friend did Roxanne and Stacey and had such a great response that we wanted to remake it, and improve it~
So, last night we finally had our big night and got to wear our hard work to Mickey's Halloween Party, at Disneyland. And I was so happy at the reactions we got and the really amazing people we met! It was so worth the hard work and planning put into our costumes.


 I also have to say, the best reaction was from Chip and Dale, and it was amazing the love we got from them, and so extremely flattering!


I also shot my first photoshoot for the costume in Roxanne's 'Max's Nightmare' scene.
I'm happy to say my whole group, and the my other friend who was unable to join us as an extra special character will be shooting a legitimate photoshoot for our costumes in the coming month [when we have the time to], so we can have beautiful copies of our costumes.

But yeah, basically this was the reason of my impromptu hiatus. SO, it's nice to be back on my blog, and thanks for the patience!

<3CarisseIris

Tuesday, August 12, 2014

Flower Crown~ DIY

I know, I'm a bit late to the flower crown trend, but with pretty things like this~ It's better late than never, right? Haha..
But I've been eyeing flower crowns since spring, but I kept putting off buying one because the really full and pretty ones are so expensive, and I don't have that cash to just spend on a seasonal accessory like that.
So, after watching so many tutorials on youtube, I decided to just make one myself since it will be cheaper, I have more control on what my flower crown looks like and I learn a new skill to put under my belt. It's a win win!
So, let's get started~

What you will need:
Thick floral wire~ mine is wrapped in a natural coloured twine.
Pliers
Scissors [strong enough to cut your wire and the plastic flower stems]
Fake flowers~15-30 flower heads per crown, is a good estimate if you want a very dense crown.
Hot glue gun

Optional:
Items like crystals, pearls [or starfish] to further personalize your crown.

Step one: Behead all the flowers. So, just take your scissors and cut off all their heads, or pull them off the stem if you can. 

Step two: Take your wire, and wrap it around your head, once you get that measurement, leave an extra two-three inches and cut it. 

Step three: Cut two other wires the same length as the piece you just cut~ You will want three wires of the same length.
Step four: Braid your wire, to form a secure base for your crown, when you're done, use your pliers to wrap the ends around each other, and tuck all remaining wire around it's self so you have no sharp pieces sticking out.

[Optional, you can cut a small 3-4 inch piece of wire to wrap around your end to make it look neater and to cover any sharp wire ends you can't conceal~ It can also serve to make the end even more sturdy.]
Step five: Now is the fun part, you can lay out your crown design, and map out how you want your crown to look!
Step six: Hot glue your flower heads to your crown~ This step takes the most time, and it's a lot of adjusting and probably burning yourself every so often.
I like to start where my crown is the most dense, which tends to be near the front, then work out.
I put my main flowers down first, then, if I fill it out with smaller ones, I do that after the crown is mostly covered.

Step seven [optional]: decorate your crown with bling or other accessories~ I attached all my extras with hot glue since it's fast to dry and pretty stable. If you want more stability, you can use epoxy, but that takes time to fully cure.

That's it!

It's a fairly simple process, but it can be a bit time consuming depending how voluminous and/or how detailed you want your flower crown to be.

I ended up making two crowns with how many flower heads I had. 

My mermaid crown^^

Then, my massive flower crown, with lots of embellishments^^

I am a bit more biased to my mermaid themed crown~ It makes me feel absolutely magical!
I think it goes quite well with my mermaid tee from Brandy Melville, haha..
Flower crowns are a pretty and delicate accessory for any season [probably with seasonal blooms and colour schemes for times like fall and winter]~ They can take any look to another level, and are real attention grabbers. Not to mention, they are pretty easy to make by yourself and to fit any budget.


I'm so happy to finally have a flower crown to call my own!

I hope you could find the tutorial helpful!
Make a flower crown, not just for yourself but for the lovely people in your life, everyone enjoys a fun flower crown~~

<3CarisseIris