Showing posts with label cosplay. Show all posts

Sunday, September 16, 2018

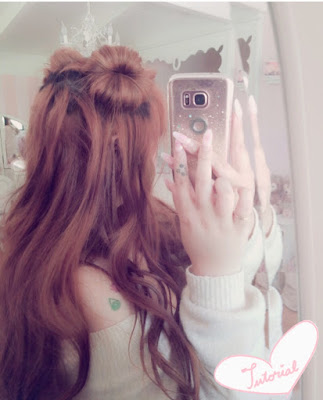
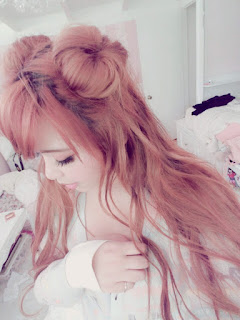
Mini Doughnut Hair~ Twin Buns Tutorial~


So, maybe a year ago, my friend was sleeping over and we got really into the anime Please tell me Galko-chan, and as a joke midway though watching the series, I quickly figured out how to recreate Galko's hair and surprised my friend with a small in person demonstration of how easy her hairstyle is to wear.

Well, I ended up falling in love with how cute and extremely easy the mini doughnnut hair is to do, after that, and have been wearing it quite often this past year!

The way to wear mini donuts, is so quick and simple that I felt a small pictorial would be the most convenient way to explain how to recreate the look.


Items needed:
2 socks (I used some thin ankle socks)
Comb, to part hair cleanly

Optional:
Alligator clips, for hair separation
Curler


The first step is to make a sock doughnut~ easily done by cutting off the toe of the sock and rolling it into a doughnut.

The smaller the sock, the more petite the buns are. I personally like thin fabric ankle socks because the buns come out cute and compact. Larger, thicker socks will make buns that look large and plump, like a big fluffy yeast doughnut.


So, to start, separate the top 1/3 of hair, roughly an inch above the ear line.
To keep the hair easily organized, I like to use alligator clips but tying the bottom section of hair into an elastic is just as convenient too. 

Next, split the top section of hair down the middle and arrange the face framing pieces of hair as desired.

Taking one side of the parted area, pull hair though one sock roll.

Slowly and neatly working from the end of the hair down, tuck the hair over the sock roll and start rolling the doughnut down the hair. Making sure to keep the hair evenly spaced and keeping the rolling process neat will make the bun look cleaner AND will keep extra frustration at bay when it comes time to fixing up the doughnuts after.

After completing the roll, pull and fluff out any hairs where necessary to make the doughnut look nice and round.

Repeat the process on the second section of hair.

Then finally, style the rest of the hair as desired. I personally love how the doughnuts look perched on loose waves.

Some practice might be necessary (especially with long hair), but after getting the hang of it, the hair style is so quick to master!

I love wearing mini doughnut hair when I'm in a rush for classes but still want to look like I put in effort to look good, or days I just want to look cute and playful, but the most common scenario for me is when I have slightly dirty hair that needs to sorted out.

For fans of Galko-chan, or those who might get frustrated with trying to make even doughnuts, the style even  looks cute with one side doughnut-ed and the other section put into a ponytail.


So, from your local, off an on again gaijin-gyaru, I hope that this pictorial was helpful and that rocking mini doughnut hair might become something fun and new for my readers to try out, maybe come to love as I have!

Maybe if I ever have more time to watch cartoons, I can find more 2d hair inspiration to showcase here too? I'll have to wait till winter break for that though;;

<3CarisseIris

Wednesday, November 22, 2017

Succubus horns~ DIY


Halloween may be over but demon horns are never out of season~ ho ho ho!

Due to popular demand, a tutorial on my quick/easy Succubus horns is here, just in time for Christmas.

Items I used:
Headband
Aluminum foil
Packing tape
Paper mache, (I had a tub of paper mache powder from a few years ago on hand.)
Hot glue gun
Acrylic Paint

Optional:
Hair Dryer (to speed the process up)
Paint sealer
Santa Hat
Ribbon


Step one~ Probably the most time consuming step in the process, is to make the base shape of the horns. I may have kindly taken my horn design from a mobile game that I play [Lineplay] Make sure you pay attention to the fine details on this step, since it will be your foundation, like; making sure they look even, and that they are angled to sit on your head in the way you prefer.


Second step is to cover your horns in masking tape, I like to rip them into smaller pieces so its easier to cover the contours of the horns and that they lay flat. It will also lessen the work to do in the next step~ If  one's on a time crunch and doesn't mind the texture, the horns could be painted at this step and be good to go! 


Third step is to cover the horns in an extremely thin layer of paper mache, which will cover up any extra texture and also give a but more support to strengthen the horns. To speed up the drying process I blasted it with my hair dryer and I easily had the both horns dry in my hands in under 15 minutes. 


Then, when dry, paint the horns~  The paint could also be sealed after to make the horns more durable, but it is just a personal preference.

Optional: I took the trim off Christmas decor and hot glued it to the bottom of my horns to make them cute and fluffy.


The last step is to use a hot glue gun and glue the horns onto a headband (I couldn't find a plain headband so I took apart some reindeer antlers for this project.). It really don't need to be neat, just as long as it's secure.


Mine definitely was a mess inside but it works just as well~

Then when it's all done you can do any finalizing touches if need be. For me, that was adding some ribbon!


My finished horns are a success, and look super cute. My first initial pair only took me 3 hours on Halloween day. This pair probably took me 5 hours since I wanted them to look super clean on camera. 

The horn construction is pretty cheap, quite sturdy and most items could be found at home or acquired in a pinch. 


I seriously love this look and how the horns looks while worn, and I definitely got many compliments when I wore them on Halloween. In all honesty, given the items used for construction, I could also use them for a holiday look without a huge stretch in reasoning!


I hope this tutorial was helpful and, as a fellow procrastinator, that it might help those in need of a last minute costume!

<3CarisseIris

Saturday, November 1, 2014

Monster High Halloween Looks

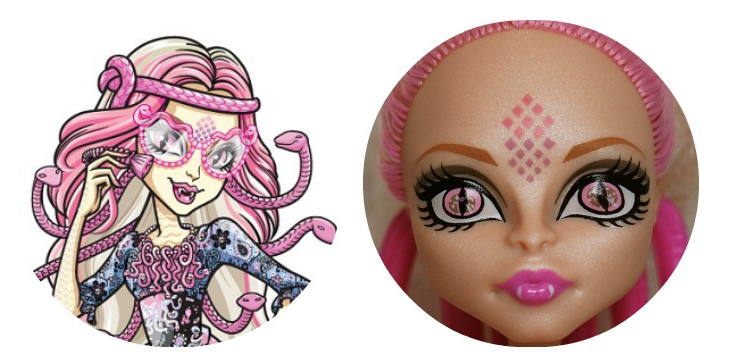
Halloween is my favourite holiday, and besides going all out for Disneyland every year, I like to put my all into actual Halloween night looks too.  This year I wrangled up my friend to dress up with me and we decided to be Monster High dolls. The night before we were looking at the different dolls finding ones we could pull off decently and we decided on Twyla, who's a boogyman and Viperine Gorgon, who's a gorgon [like Medusa]. 
I'm not sure if anyone loves seeing how people create looks, but I personally love it and thought, 'Why not!', and just share on here how I create my makeup looks...

I always start with some idea, for these looks I was lucky enough to have a lot of pictures of the dolls also the animations and screen grabs. So, I take those ideas and make a bunch of face charts.
 
I usually end up making 2-4 face charts per look, for face charts I always make my own and photo copy the blank face, so it's easier and quicker for me to just colour on it to map out my ideas. Above is the look I loved the best and ended up going with for my friend.
The description of the character is said to have grey skin, but the doll is much more lavender in colour so I ended up air brushing my friend with a lavender base then whipped up some grey/blue powder to set it, to give her a mix of both and the colour turned out just lovely. All her contour was done in navy and grey so to blend nicely with the periwinkle skin tone. I also airbrushed her hair, but it didn't show up so well on camera so I did retouch it and her iris' with some photoshop. Luckily her doll's makeup is very basic and I went with a classic cut crease + winged liner combo and finished it off with some Dolly wink lashes, top and bottom. The bottom lashes I coloured with blue eyeliner.
For blush, I went with a berry colour mixed with a touch of peach just to make her look a bit less undead.
For some reason, I picked Viperine because she looked the easiest, plus airbrushing my own face is a bit tricky for me.. The exact eye shape is hard to pull off neatly on my eyes especially because my inner corner of my eyes are hooded, plus I didn't want the look to appear clown-ish or very over drawn.
Immediately in my head I knew that I would be using Adore Delano as partial inspiration because of the way she draws her inner eye corners, Bianca Del Rio, for the way she draws her crease into her nose contour and then realized the way AV gals do their lower lash line would work well for the look too, so I put it all together and I figured out what I was doing~
After two face charts, I decided that instead of going with a taupe eye, like the doll, I would go a bit extreme with golds and bronze colours and it would be more exciting visually. I also changed the scale colours to fit that idea better so those became a mauve and orange for the look.
For my base, I mixed my foundation with a very shimmery eye shadow [I went out to buy some Wet and Wild shimmer for it], for up close the doll has a glittery and shiny base colour so I wanted to replicate that. I then contoured my face in the extreme with a bronzer and other shimmery copper eye shadows that I own then went in and highlighted my face with the same shimmer eye shadow that I put into my foundation, even some very pigmented gold shadow at the highest points of my face.
I drew the scales with some lip liner then filled it in with a bit of eye shadow.
 The eyes are an extended cut crease. The liner is winged and extended down past the tear duct. The lower lash line is dropped, then is extended under and past my natural eye line. I have on house of lash, top lashes and Dollywink bottom lashes. 
If anyone's interested [these] are the contacts I'm using.

I'm pretty happy with how these looks came out, way better than I was expecting, but they still do need some work if I ever decide to recreate them... 

If anything, I hope you enjoyed the peek into how I create my makeup looks. And yes, I even do face charts for when I do simple looks like my Roxanne costume and sometimes even my gyaru looks when I feel like trying out a new eye shape.. They're a great visualization for me and I don't have to waste my makeup on them.

Hope everyone had a fun and safe Halloween!

<3CarisseIris


Sunday, October 26, 2014

DIY Belivable Costume Braces.

After scrounging online, my friend [who I use in this tutorial], and I weren't able to find how to make believable, yet at all, safe, braces for her costume, or even find ones that were affordable, believable and custom fit, so we took it upon ourselves to figure out a way to create fake braces for her costume this year.
This tutorial, is actually pretty easy but it does take some time and effort, but it's completely worth it because not only is it sturdy but reusable for whenever you might need them to take a costume to the next level!
 What you will need:
Scarecrow brand vampire teeth, the shortest ones [specifically this brand because it comes with plaster, which is important to the braces]
26 gauge wire
Earring backings, 'butterfly' earring backs
Orthodontic wax, which you can usually find at drugstores
Sandpaper or file [not pictured]
Wire cutters [not pictured]

Let's get started!

1. Put the vampire teeth on the specified teeth, do not fit them yet, and eyeball how much you need to file the teeth down.

2.Use the sandpaper or a file to file the vampire teeth down as much as you need.

3. Follow the instructions, and fit the teeth.

4. KEEP THE LEFTOVER PLASTER, you will be using it later.

5. Use wire cutters and cut two long pieces of wire, with a bit of give... We didn't measure but eyeballing it, roughly between 6 and 10 inches, just to be safe.

6.Take one wire and 's' it though a bracket, pictured below.

 7. Take the second wire and 's' it the opposite way.
 8. Secure the bracket by twisting the ends of the wire a few times, pictured below.
 9. Repeat with the other earring backs to create more brackets. You will need a bracket for the two vampire teeth and the teeth in between.  [we only needed 6 brackets in total]
         -for note:
              Before doing the next bracket, check in the mirror with your wire and first earring back against your teeth and guesstimate where the next earring backing needs to be placed on the wire so your brackets are as well aligned as they can be. Repeat checking between every bracket.

10. Leave about an inch and a half of wire at the end, this will make the braces look like they continue though the whole mouth.

11. Add a bit of orthodontic wax onto the end of the wire to protect your mouth against sharp edges.

12. Put on your, now fitted, vampire teeth.

13. Align the brackets and wire to where they should be; a bracket to each tooth and the end brackets should be on your vampire teeth caps.

14. Shape the wires so the brackets lay as close as possible to each tooth, and fit comfortably to the curve of your teeth.

15. Apply a coat of left over plaster to the back of the two end earring backings [brackets]. Make sure the vampire teeth caps are dry and stick the brackets onto the two teeth.

16. Hold the plaster coated brackets in place to your teeth for at least 30 full seconds.

17. Keep the braces in your teeth for 2 minutes. Please keep your lips from covering the teeth and interrupting the brackets setting.

18. Just keep smiling, for those two minutes.

19. YOU ARE DONE.
 You now have a pair of reusable and believable costume braces!
Put in and remove your braces by using the vampire teeth to handle them, since they're the most secure section.

Please do not eat or drink with them on, unless you drink with a straw, otherwise you risk damaging the braces you created.

You can also store them in the case the vampire teeth came from, which is pretty helpful to keep them debris free.

Enjoy your new braces, and I hope this tutorial was helpful to you~
Have a happy and safe Halloween!

<3CarisseIris

Saturday, October 11, 2014

Long Time no see!! This is what I've been up to~

I've been working on my halloween costume, and parts for my friend's costumes, this whole month and a half~
Roxanne, from a goofy movie<3
[and her friends~ Pistol, Beret Girl, and Stacey]
4 years ago, my friend did Roxanne and Stacey and had such a great response that we wanted to remake it, and improve it~
So, last night we finally had our big night and got to wear our hard work to Mickey's Halloween Party, at Disneyland. And I was so happy at the reactions we got and the really amazing people we met! It was so worth the hard work and planning put into our costumes.


 I also have to say, the best reaction was from Chip and Dale, and it was amazing the love we got from them, and so extremely flattering!


I also shot my first photoshoot for the costume in Roxanne's 'Max's Nightmare' scene.
I'm happy to say my whole group, and the my other friend who was unable to join us as an extra special character will be shooting a legitimate photoshoot for our costumes in the coming month [when we have the time to], so we can have beautiful copies of our costumes.

But yeah, basically this was the reason of my impromptu hiatus. SO, it's nice to be back on my blog, and thanks for the patience!

<3CarisseIris